
Self hosted maps for (practically) free
Tue Jun 03 2025
Using OpenStreetMap, ProtoMaps, Maputnik and MapLibre to self host custom maps is a really fun tech adventure! These low cost and serverless maps work on the web, react native, android, and iOS. Break free from Google Maps, Apple Maps, and Mapbox!
Note that the ProtoMaps API is a great way to get started with custom maps without having to do all the technical stuff below!
Background
With OpenStreetMap as its foundation, the open source mapping community has some truly amazing projects. Protomaps is a project that elevates the entire open mapping community.
Traditionally map data has been broken down into small "tiles" of either pre-rendered image data or raw map data. These small tiles of data are then downloaded one at a time and stitched together into a map on your web browser or mobile app. It has always been a difficult task to either store map data in a database or pre-process data into enormous numbers of pre-cut map tiles. The Protomaps team solves this problem by storing map tiles in one large file using a format called PMTiles. Clever use of HTTP range requests allows clients to download individual map tiles from this one file source. Farewell expensive Posgres instances!
Step 1 : Get map data from geofabrik
Use Geofabrik's OpenStreetMap data extracts site to choose and download a region (.osm.pbf) of the world that you wish to map : https://download.geofabrik.de/. I recommend you choose an extract that is less than 500MB to get started with. I live in Colorado so you'll see colorado-latest.osm.pbf referenced in the code and commands below.
Important Note : the process described in this post will work to host maps that span the entire world. If you do this, make sure you understand the costs associated with uploading and distributing the data via your hosting platform of choice. See more info about hosting .pmtiles files here : https://docs.protomaps.com/pmtiles/cloud-storage.
Step 2 : Install Tilemaker
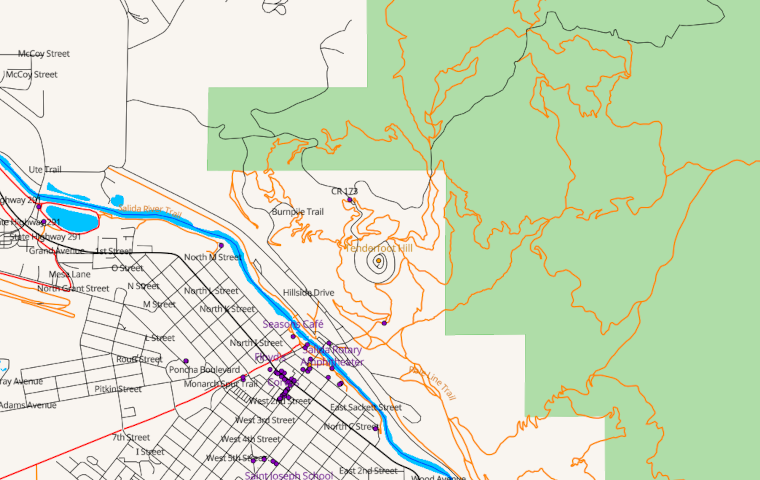
Tilemaker is tool for transforming map data. We can use it to take our source .osm.pbf file and transform it into a .pmtiles file. The best thing about Tilemaker is that you can use a lua script to organize map features into layers however you want. In this post I am going to take trail data (osm tag highway=path) and make it available for much higher zoom levels than it is normally available. I want my map to show trails when zoomed really far out.
Get Tilemaker installed on your system : https://github.com/systemed/tilemaker/tree/master?tab=readme-ov-file#installing.
You can also use the docker image if you don't want to install directly or you're on Windows.
Step 3 : Customize .json and .lua config files for tilemaker
To process the OpenStreetMap data you are going to need two config files. A .json file that describes the layers in your map, and a .lua file that processes map data and packs it into the layers. The /resources directory in the Tilemaker repo is where I got started : https://github.com/systemed/tilemaker/tree/master/resources.
Since Tilemaker has great docs I am not going to dive into all the details here, but I basically took the config-example.json file and the process-example.lua file and built them up a bit with some extra logic. Note that if you use the "openmaptiles" examples you need to run the get-coastline.sh, and get-landcover.sh scripts (in the root of the repo) to get some additional map data.
My .json file can be found here : https://gist.github.com/aaronblondeau/0327534340e2a04c1acb4a53df00faa6 And my .lua file can be found here: https://gist.github.com/aaronblondeau/20efcaffb0d799c0f191de68952d609c
Step 4 : Run tilemaker
Once the config files are ready you can run Tilemaker with a command like this:
tilemaker --input ./data/colorado-latest.osm.pbf \
          --output ./data/colorado-latest.pmtiles \
          --config ./config-demo.json \
          --process ./process-demo.lua
All of Colorado processes in under a minute on my machine, so iterating on the .json and .lua files was quick and easy.
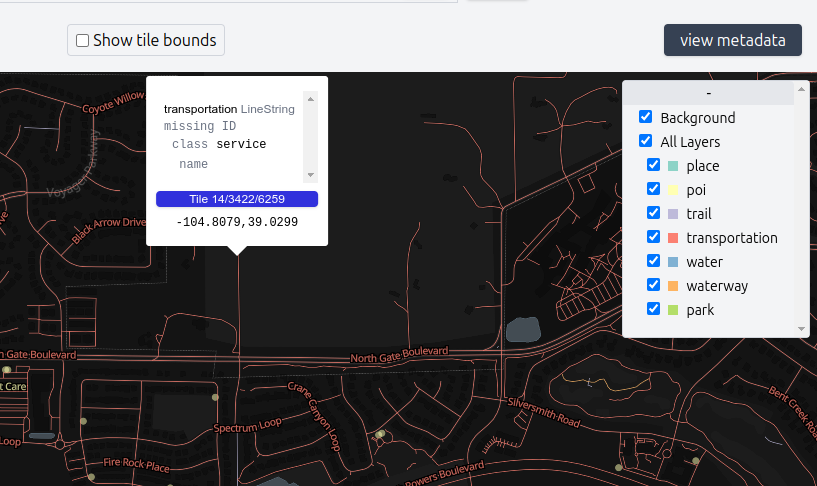
Step 5 : Preview tiles with https://pmtiles.io/
Once you have a .pmtiles file you can inspect it at https://pmtiles.io/.
A couple of notes : make sure to check the background box so you can pan/zoom to find your map's region. Data may not appear right away if you're using a large .pmtiles file, so give it a minute to load.
Step 6 : Upload .pmtiles to S3
Once your .pmtiles file is ready to go the best way to use it to is to upload it to a cloud storage provider that supports HTTP range requests. AWS S3 is what I used. If your .pmtiles file is large, make sure you understand the costs associated with uploading and hosting it!
If you use S3, you'll need to at a minimum:
- Allow public read access to your .pmtiles file
- Set a CORS policy that allows web clients to read the file.
Here is the CORS policy I used. More info here.
[
    {
        "AllowedHeaders": [
            "*"
        ],
        "AllowedMethods": [
            "GET",
            "HEAD"
        ],
        "AllowedOrigins": [
            "*"
        ],
        "ExposeHeaders": [],
        "MaxAgeSeconds": 3000
    }
]
The Protomaps folks have instructions for more production worthy hosting setups here : https://docs.protomaps.com/deploy/aws.
Step 7 : Develop map style with maputnik
Once your .pmtiles file is available online, head over to Maputnik to start developing your map style.
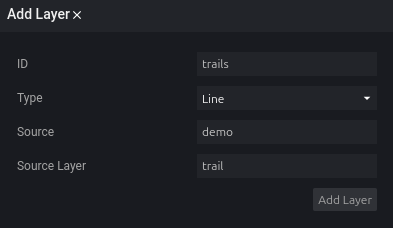
Hit the "Editor button" and then start by setting up a source:

The add layers:
Not seeing anything?
- The maputnik editor may not be centered on your map region. Use the Search box to center on a city in your map's region.
- Make sure the map zoom is set to something appropriate (like 12)
- Be sure to set a color for your layer
Styling with Maputnik deserves it's own book so I won't go into all the details here, but you can get pretty far by clicking around and experimenting with layers.
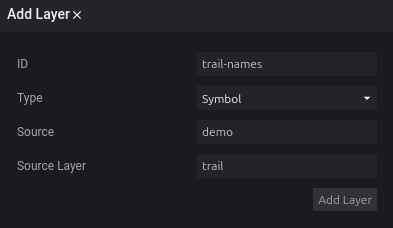
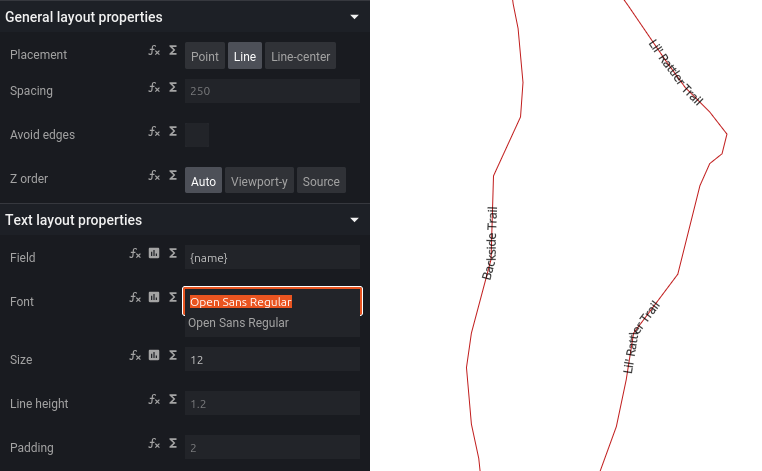
A big unlock for me was to make sure I used existing fonts when trying to add trail names
You'll note that the default "glyphs" that maputnik uses is here. This is a way of pre-packaging all the fonts used by the style.
"glyphs": "https://orangemug.github.io/font-glyphs/glyphs/{fontstack}/{range}.pbf",
So, when adding a symbol layer:
Make sure to use a font included in the glyphs' .pbf file:
I also used the fantastic Americana map style for example code while styling some components of my map.
Step 8 : Upload map style to S3
Once your map style is ready, export it to JSON via the Save button in Maputnik.
You'll need to double check a few things with the .json before you can start using it to show maps in your apps.
- Make sure you have a source for fonts set
"glyphs": "https://orangemug.github.io/font-glyphs/glyphs/{fontstack}/{range}.pbf",
- Make sure you have an image sprite set. To prevent errors on Android, do this even if you're not using a sprite.
"sprite": "https://americanamap.org/sprites/sprite",
- Make sure the map has a default center and zoom and that the source layer is publicly accessible (with CORS):
"center": [-106, 38.5],
"zoom": 12,
"sources": {
"demo": {
    "type": "vector",
    "url": "pmtiles://https://somebucket.s3.us-west-2.amazonaws.com/colorado-latest.pmtiles"
  }
},
Once the map style.json file is ready, put it online too. I hosted mine in the same bucket as my .pmtiles file and made sure it was publicly accessible.
Step 9 : Use with maplibregl
MapLibre ties everything together and provides a way to render your map on the web and in mobile apps.
Here are code example code snippets for various platforms:
HTML
<!DOCTYPE html>
<html lang="en">
<head>
    <meta charset="UTF-8">
    <meta name="viewport" content="width=device-width, initial-scale=1.0">
    <title>Demo Map</title>
    <script src="https://unpkg.com/maplibre-gl@^5.5.0/dist/maplibre-gl.js"></script>
    <link href="https://unpkg.com/maplibre-gl@^5.5.0/dist/maplibre-gl.css" rel="stylesheet" />
    <script src="https://unpkg.com/pmtiles@3.2.0/dist/pmtiles.js"></script>
</head>
<body>
    <div id="map" style="width: 100%; height: 100vh"></div>
    <script>
        const protocol = new pmtiles.Protocol();
        maplibregl.addProtocol('pmtiles', protocol.tile);
        var map = new maplibregl.Map({
            container: 'map',
            style: 'https://somebucket.s3.us-west-2.amazonaws.com/demo_pmtiles.json',
            center: [-106.0, 38.5],
            zoom: 12
        });
    </script>
</body>
</html>
React Native
Follow instructions for the React Native plugin here : https://maplibre.org/maplibre-react-native/docs/setup/getting-started
import { Camera, MapView } from "@maplibre/maplibre-react-native";
import { View } from "react-native";

export default function Index() {
  return (
    <View
      style=
    >
      <MapView
        style=
        mapStyle={
          "https://somebucket.s3.us-west-2.amazonaws.com/demo_pmtiles.json"
        }
      >
        <Camera centerCoordinate={[-106.0, 38.5]} zoomLevel={12} />
      </MapView>
    </View>
  );
}
iOS (SwiftUI)
Follow instructions here : https://maplibre.org/maplibre-native/ios/latest/documentation/maplibre-native-for-ios/gettingstarted#SwiftUI
Then setup a map view.
struct SimpleMap: UIViewRepresentable {
    func makeUIView(context _: Context) -> MLNMapView {
        let mapView = MLNMapView()
        mapView.styleURL = URL(string: "https://somebucket.s3.us-west-2.amazonaws.com/demo_pmtiles.json")!
        mapView.latitude = 38.5
        mapView.longitude = -106.0
        mapView.zoomLevel = 12
        return mapView
    }

    func updateUIView(_: MLNMapView, context _: Context) {}
}

struct ContentView: View {
    var body: some View {
        VStack {
            SimpleMap().edgesIgnoringSafeArea(.all)
        }
    }
}

#Preview {
    ContentView()
}
Android (Jetpack Compose)
First add to build.gradle.kts (app)
implementation("org.maplibre.gl:android-sdk:11.8.5")
Then use code:
package com.example.demo

import android.os.Bundle
import androidx.activity.ComponentActivity
import androidx.activity.compose.setContent
import androidx.activity.enableEdgeToEdge
import androidx.compose.foundation.background
import androidx.compose.foundation.layout.fillMaxSize
import androidx.compose.foundation.layout.padding
import androidx.compose.material3.Scaffold
import androidx.compose.runtime.Composable
import androidx.compose.ui.Modifier
import androidx.compose.ui.graphics.Color
import androidx.compose.ui.graphics.RectangleShape
import androidx.compose.ui.tooling.preview.Preview
import androidx.compose.ui.viewinterop.AndroidView
import org.maplibre.android.MapLibre
import org.maplibre.android.annotations.MarkerOptions
import org.maplibre.android.camera.CameraPosition
import org.maplibre.android.geometry.LatLng
import org.maplibre.android.maps.MapView
import com.example.demo.ui.theme.DemoMapAndroidTheme

class MainActivity : ComponentActivity() {
    override fun onCreate(savedInstanceState: Bundle?) {
        super.onCreate(savedInstanceState)
        enableEdgeToEdge()
        setContent {
            DemoMapAndroidTheme {
                Scaffold(modifier = Modifier.fillMaxSize()) { innerPadding ->
                    MapView(
                        modifier = Modifier.padding(innerPadding)
                    )
                }
            }
        }
    }
}

@Composable
fun MapView(modifier: Modifier = Modifier) {
    // TODO - consider using key here to prevent recomposition
    AndroidView(
        modifier=modifier.background(color= Color.Blue, shape= RectangleShape),
        factory = { context ->
            MapLibre.getInstance(context)
            val mapView = MapView(context)
            val styleUrl = "https://somebucket.s3.us-west-2.amazonaws.com/demo_pmtiles.json"
            mapView.onCreate(null)
            mapView.getMapAsync { map ->
                // Set the style after mapView was loaded
                map.setStyle(styleUrl) {
                    map.uiSettings.setAttributionMargins(15, 0, 0, 15)
                    // Set the map view center
                    map.cameraPosition = CameraPosition.Builder()
                        .target(LatLng(38.5, -106.0))
                        .zoom(12.0)
                        .build()
                }

                map.addMarker(
                    MarkerOptions()
                        .position(LatLng(38.5, -106.0))
                        .setTitle("Major Lines Man")
                        .setSnippet("38.5 and -106.0 cross here!")
                )
            }
            mapView
        }
    )
}

@Preview
@Composable
fun MapViewPreview() {
    MapView(modifier = Modifier.fillMaxSize())
}